Dear Sisters

Dear Sisters
Highland 12th Ward Sisters
Showing posts with label Recipes. Show all posts

Monday, October 10, 2016

Stingy Jack...The Story of Jack O' Lanterns

 Punkin Love...
What is it about the sight of plump pumpkins in an autumn garden that so gladdens the heart?  At summer's end I crave the golds and oranges...the changing colors.  The sky seems bluer and the light of the sun slants golden across the face of the mountains.  In the farmers markets, bins and tables are piled high with pumpkins of every shape and size.

This morning the air was a bit crisper and I got the sudden craving for my mother's pumpkin chocolate chip cookies.  Pumpkin recipes are all over Pinterest...fancy cheesecakes and even Pumpkin Snickerdoodles!  In my sentimental heart, nothing could ever take the place of Mom's cookies.  I shared the recipe last fall when my blog was new.  Stay tuned...you'll find it here again after the story of "Stingy Jack."

Stingy Jack...
Halloween originated in the Celtic lands of Ireland and Scotland.

The phrase "Jack o' lantern" was first used to describe a mysterious light seen flickering over the marshes at night.  When approached...it always seems to be just out of reach.  The phenomenon is also known as "will o' the wisp."

I had always heard that many of our Halloween customs originated in Ireland...especially that of the Jack o' lantern.  So I thought I would find out a little of the history of our pumpkin friend.  I found the legend on Stingy Jack on many websites, but the story on History.com was a little more complete.  The following info is taken from the site...

Vintage Postcard...Scottish?
The Legend of "Stingy Jack"
People have been making jack-o'-lanterns at Halloween for centuries. The practice originated from an Irish myth about a man nicknamed "Stingy Jack." According to the story, Stingy Jack invited the Devil to have a drink with him. True to his name, Stingy Jack didn't want to pay for his drink, so he convinced the Devil to turn himself into a coin that Jack could use to buy their drinks. Once the Devil did so, Jack decided to keep the money and put it into his pocket next to a silver cross, which prevented the Devil from changing back into his original form. Jack eventually freed the Devil, under the condition that he would not bother Jack for one year and that, should Jack die, he would not claim his soul. The next year, Jack again tricked the Devil into climbing into a tree to pick a piece of fruit. While he was up in the tree, Jack carved a sign of the cross into the tree's bark so that the Devil could not come down until the Devil promised Jack not to bother him for ten more years.

Soon after, Jack died. As the legend goes, God would not allow such an unsavory figure into heaven. The Devil, upset by the trick Jack had played on him and keeping his word not to claim his soul, would not allow Jack into hell. He sent Jack off into the dark night with only a burning coal to light his way. Jack put the coal into a carved-out turnip and has been roaming the Earth with ever since. The Irish began to refer to this ghostly figure as "Jack of the Lantern," and then, simply "Jack O'Lantern." 
A traditional Irish turnip jack-o'-lantern from the early 20th century. Scary, isn't it?
From the Museum of Country Life, Ireland.

From the legend of Stingy Jack came the Irish tradition of placing Jack- o'- lanterns made of turnips and other vegetables in windows or by doors on Halloween.  The Jack-o'-lanterns are meant to scare away Stingy Jack and all the other spirits that are said to walk the earth on that night.  It wasn't until the tradition was brought to the United States by immigrants that pumpkins were used to make them.  I read a comment on a blog from Scottish reader who said that until a few years ago, pumpkins weren't as readily available as they are here.  He said that many people still carve faces into turnips on Halloween.  He admits that pumpkins are much easier to carve!

Modern Turnip Jack o' lantern.

Well...that's the story of Jack o'lantern.  I had never heard the story of Stingy Jack.  I have always loved Halloween but never took the time to learn more about it.  There is a lot more information about the Celtic celebration of "Samhain."  It might be fun to do a little more research...after I make my cookies of course!

This is the prettiest pumpkin...makes me want to bake!

Mom's Pumpkin Chocolate Chip Cookies...recipe makes a lot!


Mom's Cookie Recipe

Ingredients:

1 Cup Butter or Margarine
3 Cups Sugar
2 Eggs
1 16 oz. Can Pumpkin
2 Tsp. Vanilla
2 Tsp. Cinnamon
2 Tsp. Nutmeg
5 Cups Flour
2 Tsp. Soda
1 Tsp. Salt
2 Tsp. Baking Powder
Nuts and Chocolate Chips (As many as pleases you!)

Bake at 375 degrees for 12 minutes. Makes about 6 dozen.  If you freeze some...you might be able to enjoy them throughout the fall season.  Take some leaf-peeping!

Wednesday, August 3, 2016

Tomato Season...George's Chili Sauce!

It's Tomato Season!
Cutest tomato label ever!

Hello, sisters. Have you ever noticed that when you plant tomatoes that there is either too few...or too many?  I have the sinking feeling that this is the year of "too many."  The weather has been perfect for tomatoes...hot and sunny.  Now the plants are full of quickly ripening tomatoes...and I am not exactly in the mood to spend days huddled over a steaming canner.  Lucky for me, my husband George loves the "scientific process" of canning.  He'll do all the peeling and chopping...which I hate...and I will prepare the bottles and get the water bath canner steaming.  Fair trade I think!  In a few weeks we will make a few batches of raspberry jalapeno jelly.  You can find the recipe here: Raspbery Jalapeno Jelly.

 Of Course I Can!
She looks a tad shell-shocked if you ask me...lol!

Homemade Chili Sauce...
Yummy...better than store-bought!

George's Chili Sauce Recipe
Yield:  about six pint jars.
4 quarts peeled, cored, chopped tomatoes ( about 24 large)
2 cups chopped onions
2 cups chopped sweet red peppers (about 4 medium)
1 hot red pepper (we use the dried pepper flakes)
1 cup sugar
3 Tablespoons salt
3 Tablespoons mixed pickling spices
1 Tablespoon celery seed
1 Tablespoon mustard seed
2 1/2 cups vinegar

Combine tomatoes, onions, peppers, sugar and salt.  Simmer 45 minutes.  Tie spices in a cheesecloth bag; add to tomato mixture; cook until very thick, about 45 minutes, stirring frequently

Prepare home canning jars and lids according to manufacturers instructions.

Add vinegar to tomato mixture; cook to desired thickness. Remove spice bag.  Carefully pour hot sauce into hot jars, leaving 1/4 inch  head space.  Adjust caps.

Process 15 minutes in boiling water bath canner. 


Pretty...as well as delicious!
Use for crockpot meatballs...serve over rice!

Better than Manwich for sloppy joes...a favorite late summer supper treat!

If anyone has a favorite recipe using the fruits of our gardening, I would love to share it here.  Also, the link to the August provident living goals will be found on the top right side of the blog post.  Summer goes by way too fast and in only a few weeks the kids will be back in school. Late summer is my favorite part of the season.  I love the sleepy feel of these hot August days and the bright drooping heads of the roadside sunflowers.  They and I must be in need of a good siesta!

Happy August, Sisters!
PS...This is a repost from 2013.  


Thursday, October 16, 2014

Halloween Familly Traditions...Fun Memories from the 60's!

Halloween Family Traditions 

Where did your Halloween family traditions start?  When I was a little girl we lived in Alpine, Utah.  The old school...which was pretty creepy and had only four classrooms and a rickety fire escape...also had a gymnasium next door.  My fondest Halloween memories from that time are of the school's carnival and spook alley in that old gym.  The whole town turned out for the fun...fish pond, pop bottle ring toss, bean bag games.  Afterward we did a little trick or treating, which I did with my eyes shut...because people in costumes are scary!  I wish I had a picture or two from back then.
The Old Alpine School
Did you ever see the movie "Lady in White?"

This is one of my favorite Halloween movies.  The little boy on the cover has been locked in the school and is hiding in the cloak room...what happens next is spooky fun! The old Alpine School had cloak rooms like this.  The time period of the movie is my childhood...it's like watching your Halloween memories come to life...if you were locked in the school after the class party!
Halloween Class Party...not mine, though!

When we moved to American Fork, I was in third grade.  My mom was in PTA, so she helped out with the Harrington School carnival.  Spook alley mostly...grape eyeballs and spaghetti gutts.  The classics!   My favorite part of the carnival was the sloppy joes and doughnuts.  Today, they are still the perfect Halloween foods.

We were too broke to buy costumes, so we had to use our imaginations and whatever we could dig up out of an old box in the basement, but I think we came up with some pretty good ideas.  Still, it was annoying to be dressed as the world's scariest witch and then have to wear a coat!
 
Lovely store-bought costumes...lol!

Devey Family Trick or Treats
Like I was saying, we didn't have a lot of money, so we couldn't afford to give away full-size candy bars like many of our neighbors.  So we improvised.  With a little creativity, we made some of the most popular treats on the block.  Our two favorites were treat bags filled with candied popcorn and Tootsie Pop Ghosties.


One Saturday I made a huge batch of candied popcorn...for demonstration purposes.
My recipe card is below...still written in my high school handwriting.
(I made recipe cards for my "hope chest")

"Karen Lundell's Candied Popcorn"
Also known as "Granny Goose Popcorn."
  It was colored bright red and was sold in bags in the Potato Chip aisle. 
I can still taste that red dye they later banned.

Ingredients:
3/4 Cup Milk
2 Tablespoons Butter
2 Cups Sugar
1 Tsp. Vanilla
Food Coloring

Cook to a softball stage.  Pour over a dishpan (?) full of popcorn and stir until all the popcorn is coated and becomes sugary. Note:  I use 4 to 5 bags of microwave popcorn.  The buttered variety makes it even yummier.

My collection of little treat bags.


My favorite bag from childhood immortalized on a tee-shirt.
My "Halloween Costume."


Some bags I stuff with batting and use for ornaments.


Best filled with popcorn as Nature intended.

The Tootsie Pop Ghosties I was telling you about.

Suckers, cocktail napkins, ribbon and a marker.  Easy Peasy! I decided to give these as treats a few years ago.  But I made them a couple of weeks in advance. Do you ever have that nightmare that it's 5 p.m. on Halloween and you haven't bought the candy yet? Nowadays, they put the candy out so early, I buy it three or four times!
Target Dollar Spot Craft

Cute Little Chalkboard Signs for $1...

...become reversible with scrapbook paper and a vintage postcard graphic.
The backside was unpainted.

One of the cards I used.

Hope you enjoyed this blast from my Halloween past!


Tuesday, September 2, 2014

Apple Days...and School Days!

Beautiful Apples!

September is here at last!  Gardens are brimming with tomatoes and peppers and corn.  Time to count the canning jars and get the canner down from the top shelf of the pantry.  I am really missing having a garden this year.  George is the family gardener...and canner...and was too busy with an out of town job to take care of a garden.  So no tomato and bacon sandwiches for us.  Luckily our neighbors, the Andersons, took pity on us and brought us a big bag of the most beautiful, perfect tomatoes.

Apples are my favorite fall fruit.  I have so many happy memories of stories from my Devey grandparents, of their fruit farm in Alpine...in Fort Canyon.  During WWII, they were at their most busy, growing strawberries, raspberries and apples.  My dad has written many stories about working on the farm in his personal history.

Utah Mountain Apples fruit label...Alpine, Utah

Most fruit growers had their own crate labels.  Unfortunately, Dad's family didn't have one.  This label is from the neighboring farm.  Grandpa Mel and Grandma Zetta worked for the Andrews family when they were first married...so I have adopted their crate label.  I found two online and framed them...one for my kitchen and one for my dad as a Christmas gift.  


Canning Apple Pie Filling

Looks Delicious!
This recipe was found on  Skip To My Lou Blog
One of my Pins on Pinterest.


Apple Crisp
Also from Skip To My Lou

Apple Crisp

Mix together:

3/4 cups old fashioned oats
1/2 cup flour
1/3 cup brown sugar
1/2 teaspoon cinnamon
1/2 teaspoon nutmeg

1/4 cup butter (use a 1/2 cup to make it over the top)

Pour pie filling into a 9 X 13 pan (or smaller for thicker crisp). Spread topping on top of apples. Bake at 375 degrees for about 35 minutes until bubbly.

Serve warm with ice cream. Yum!


If you crave apple pie, but not the work...try the recipe below.


~ Apple Dumplings ~ The Pioneer Woman


Ingredients:

2 sticks butter 
1 tsp. vanilla 
1 1/2 cups sugar 
2 tubes crescent rolls 
2 granny smith apples 
12 ounces of Mountain Dew 
Cinnamon 
Vanilla ice cream

Instructions:

Peel and slice your apples.   
Wrap each slice in a crescent dough triangle and place in sprayed (greased) pan.   
In a bowl, melt your butter and stir in sugar and vanilla.   
Pour over top of the wrapped apples....or spread on top with a spoon.   
Pour the Mt. Dew all around and sprinkle with Cinnamon.   
Place in 350 degree oven for 30 to 40 minutes.  Serve hot with ice cream! 
Update 3/12 - I've had several readers tell me they like cutting the sugar down to 1 cup.  I just tried it and liked it just as much!  So, might as well use less sugar, right? :)  Believe me, it's still plenty sweet...especially with ice cream. 


I have made this before and it's almost too yummy...if that's possible!


Aren't you glad they're back in school!
Happy September!


Wednesday, October 2, 2013

Provident Living...Meals in a Jar/Bag Class!

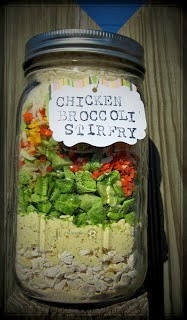
Meals in a Jar...Using Your Food Storage
 
Pinterest has many Meals in a Jar recipes
For the last while I have seen a lot of meals in jars on Pinterest.  It really piqued my interest, because I am having a hard time visualizing how to use all those cans of dehydrated and freeze dried foods in my store room.  If you are anything like me you would rather give your first born to the Gypsies than open one of those cans!  Last Thursday night, the Highland Stake sponsored a class on Meals in the Bag and Meals in the Jar.  It was held at the home of Leslie Heath.  Lisa Barker from Honeyville Farms taught the class.  While we were waiting to begin, she quickly put together a wonderful Pasta E Fagioli Soup in a countertop pressure cooker that takes only about 10 minutes to cook.  I will include the recipe later.  The following information is from Sister Barker's handout.  The handout will be sent to you in an email...it will include some recipes that I won't publish here.


I've stored it...now how do I use it?
Meals in a jar have been around for quite awhile.  We put together soup and cookie mixes for gifts for our neighbors and friends.  This takes it to a new level.  Many of the ingredient will come from those special cans we just can't bring ourselves to open...because...once they are opened they aren't good for 25 years any more!  Relax...once the cans are opened, the remainder can be resealed in canning jars using your Food Saver.  The Food Saver can also be used to seal the meal...or you can use oxygen absorbers.  Mylar bags are also used for this...but I like the pretty layers.  If you are worried about impending earthquakes...use the mylar.
 
Two books available...
"Dinner is in the Jar" and "It's in the Bag."
Both are available from Amazon.


Sample...Meal in a Jar
 
What to store...the basics

This is helpful...I've wondered about this.
 
Meals in a Bag...

Sample Meal in a Bag.
Everything...including water...is included in the bag.
 
A "Meal in a Bag" is everything needed to make a meal packed inside a color-coded shopping bag.  Breakfasts, dinners and desserts will each be a different color.  I like this idea because it uses the shelf-stable pantry foods that our families will eat.  It can be mixed with some long-term items such as freeze dried fruits and vegetables, as well as meats.  Fresh meats, vegetables and condiments can be added as desired. Colors can also be used to determine if a meal is a chicken dish or a beef dish.  Sister Barker said that her children are allowed to go down and  pick a meal from the shelf...that way they feel involved and that they have a choice.  The meal bags can be put together one at a time until you have the number that you want.  Once the meals have been put together they should be rotated.  Use them everyweek.

Recipes and instructions are included on the front of each meal bag.
 
Using a counter top electric pressure cooker...makes meals super fast!


Pasta e Fagioli Soup

1 c. FD sausage or ground beef
1 c. dehydrated onions
1 c. dehydrated shoestring carrots
1 c. FD celery
2 cloves garlic, minced
2  14.5 oz. cans diced tomatoes
2  15 oz. can red kidney beans, rinsed
1  15 oz. can great northern beans, rinsed
1  15 oz. can tomato sauce
28 oz. V-8 juice

4 c. water
2 T. rice vinegar (it's what makes all the difference)

3 t. Wayzata Tuscan Spice Blend
OR
1 1/2 t. salt
1 t. oregano
1 t. basil
1/2 t. pepper
1/2 t. thyme

1 1/2 c. ditali pasta

Put everything in electric pressure cooker and cook on HIGH for 9 minutes
with a natural release.  Delicious!
 
This recipe is a perfect Meal in a Bag...it just won't fit in a jar.  You could do it half and half with the FD veggies, spices and pasta in a jar.  Add the jar to the bag...easy peasy!  More recipes and information is on the way...check your email.

 
Note:  Remember that Conference Weekend is the time to rotate and update your 72 hour kits.